Smart Client UI Designer
Configuration
UI Designer Procedures
These procedures are ordered from easiest, most common tasks to more difficult and less‐common tasks. A simplified version of the UI Designer workspace is used for clarity. A large green arrow appears in some illustrations to identify significant elements.
Only the buttons required for the task are explained. You can hover over each button to view its purpose.
When you make a change to a screen customization, you must refresh the cache to activate your changes.
Delete Screen Elements
Delete a field
- Click a field in the column you want to delete. Frames and tool buttons
appear.
In this example, the field Label A is deleted, and the fields Label D and Label G move up.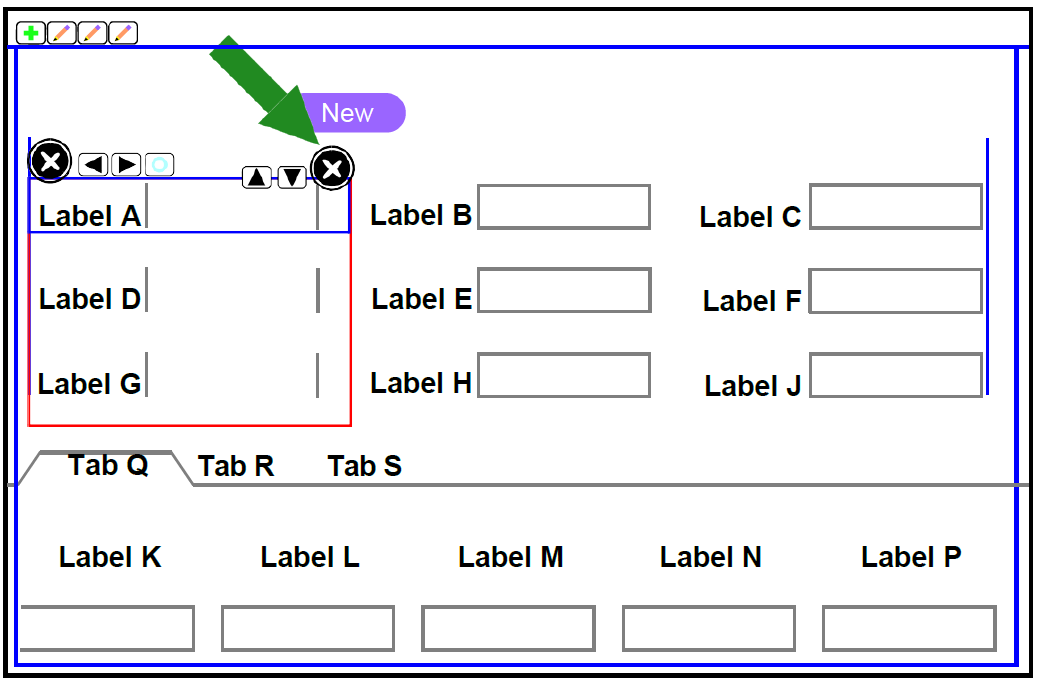
- Click the delete button
 associated with the tab, which is on the left side of the tab. The tab
is deleted and the remaining tabs move left.
associated with the tab, which is on the left side of the tab. The tab
is deleted and the remaining tabs move left.
In this example, the first tab is deleted.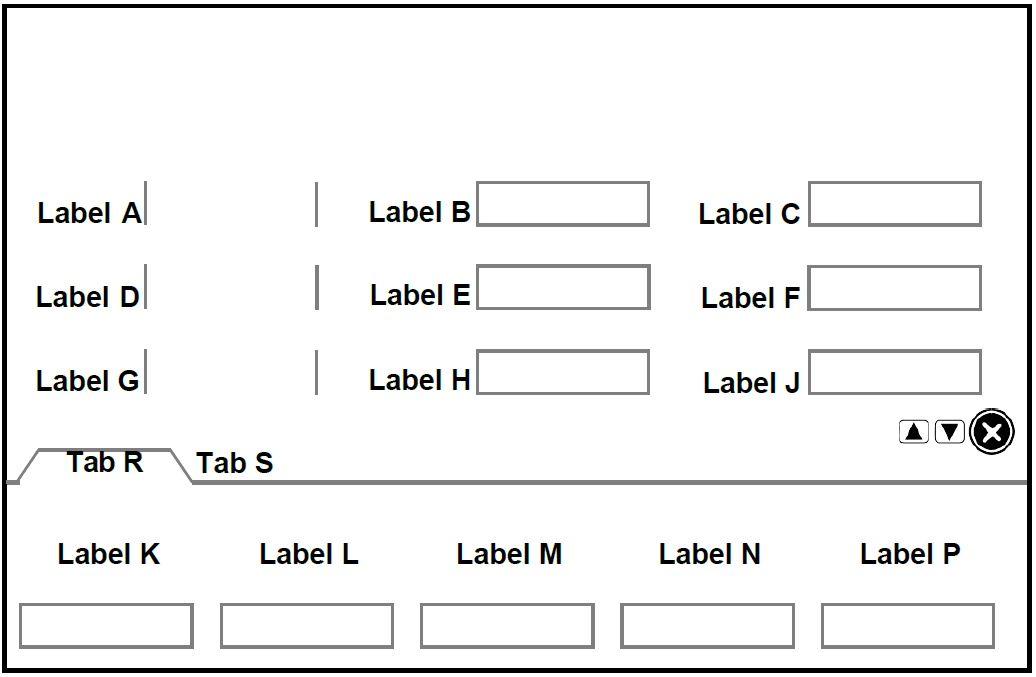
- Click Add.
- When you are done linking, click OK.
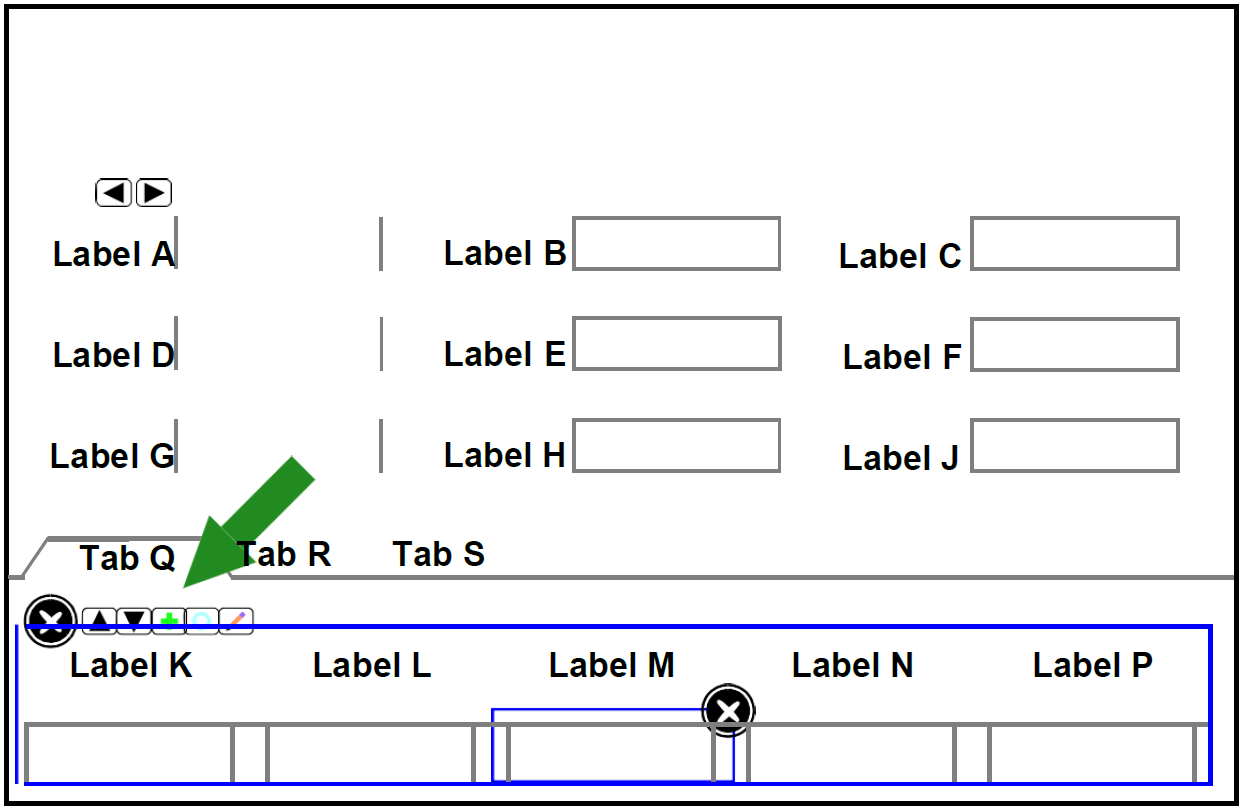
Delete a panel on a tab
- Click a field in the panel you want to delete. Frames and tool buttons
appear.
In this example, the Label M field is selected.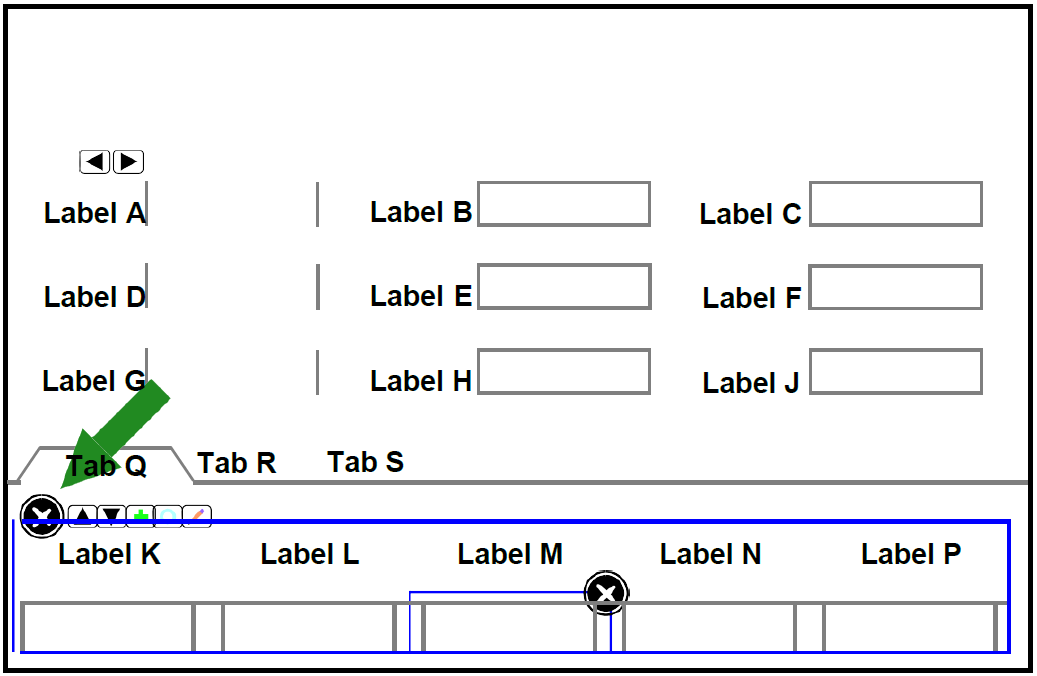
- Click the delete button
associated with the panel, which is on the left side of the panel. The
panel is deleted and the remaining information moves up.
In this example, the listview panel is deleted.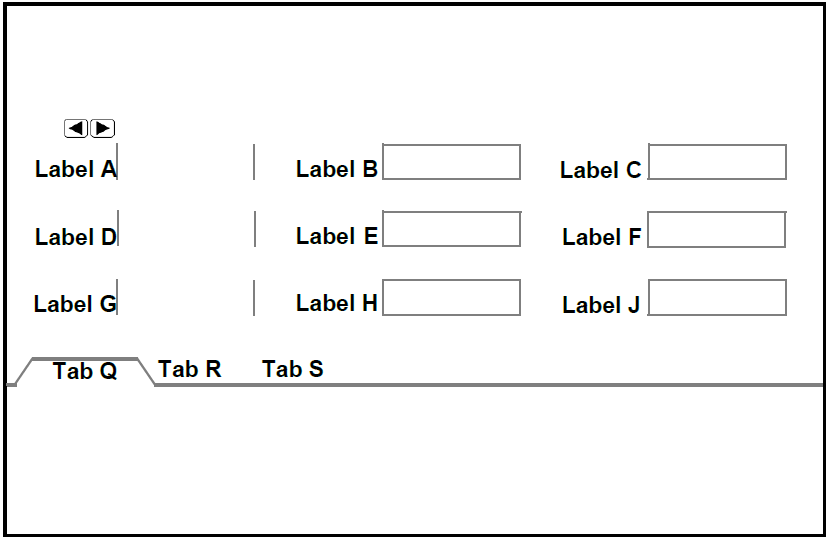
- Click Add.
- When you are done linking, click OK.
Delete a button
- Click a field in the panel you want to delete. Frames and tool buttons
appear.
In this example, the Delete button is selected.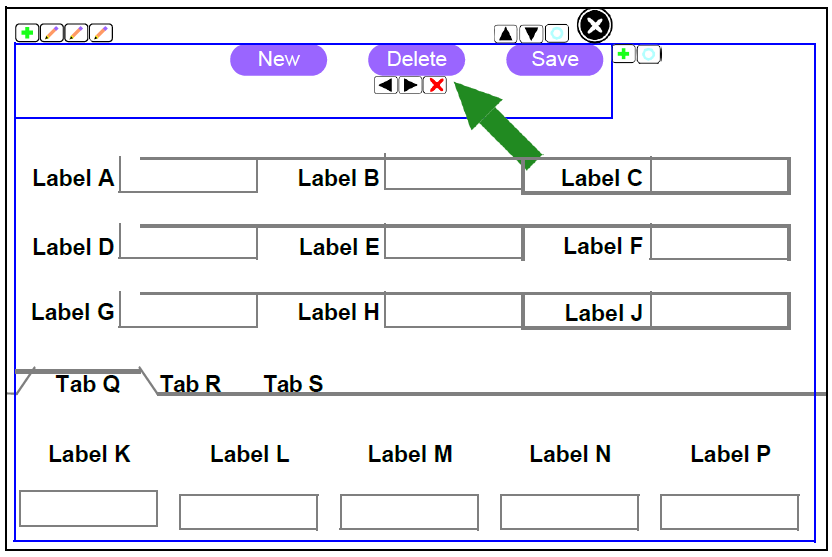
- Click the delete button
 button associated with the button, which is below the button. The button
is deleted and the remaining buttons move left.
button associated with the button, which is below the button. The button
is deleted and the remaining buttons move left.
In this example, the Delete button is deleted.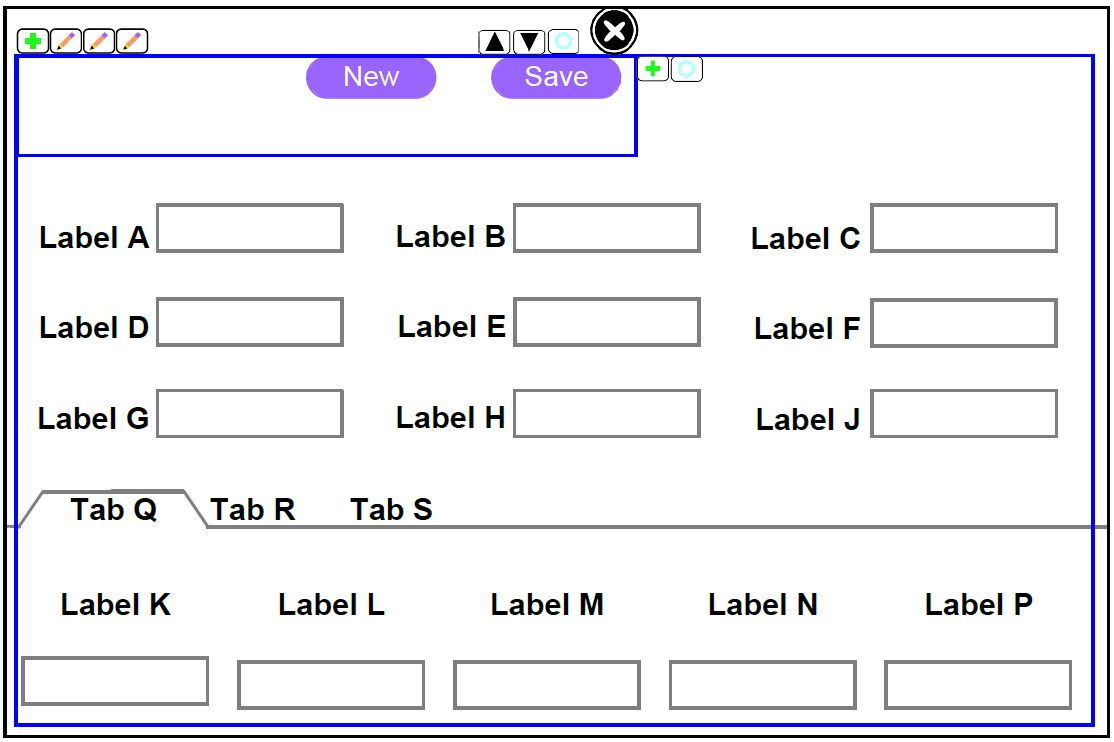
- Click Add.
- When you are done linking, click OK.
Move Screen Elements
Move a column within a panel
- Click a field in the column you want to move. Frames and tool buttons
appear.
In this example, the Label A field is selected.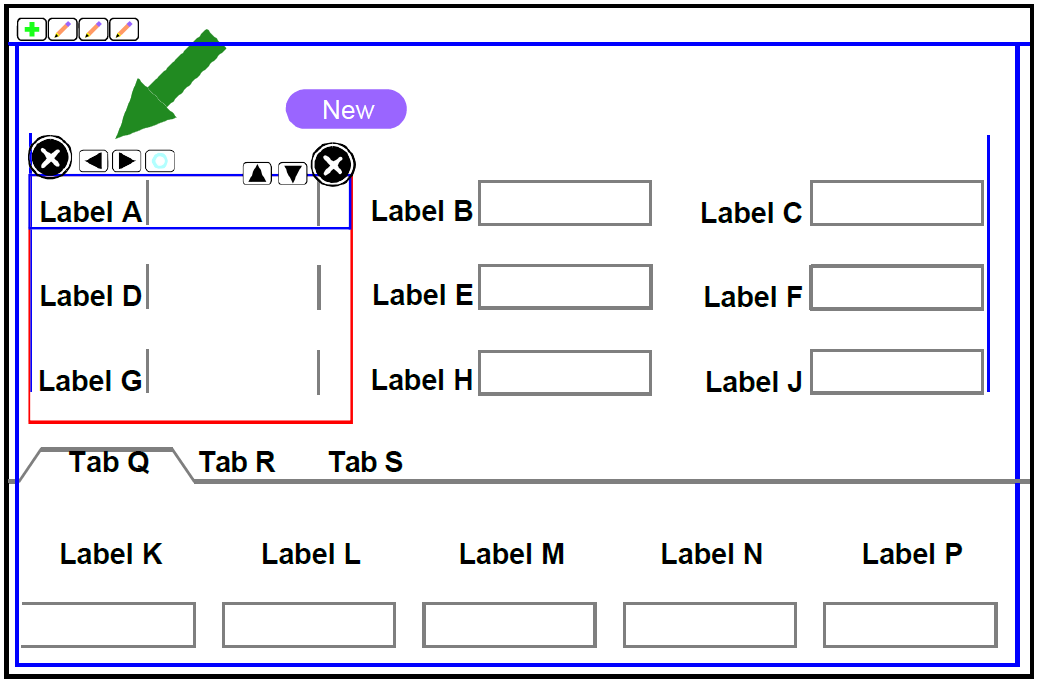
- Click the delete button
button associated with the button, which is below the button. The button
is deleted and the remaining buttons move left.
In this example, the Delete button is deleted.
- Do one of the following:
- Click the column left button
 to move the column left.
 - Click the column right button
 to move the column right.

- Click the column left button
- When you are done linking, click OK.
Move a field within a column
- Click a field in the column you want to move. Frames and tool buttons
appear.
In this example, the Label A field is selected.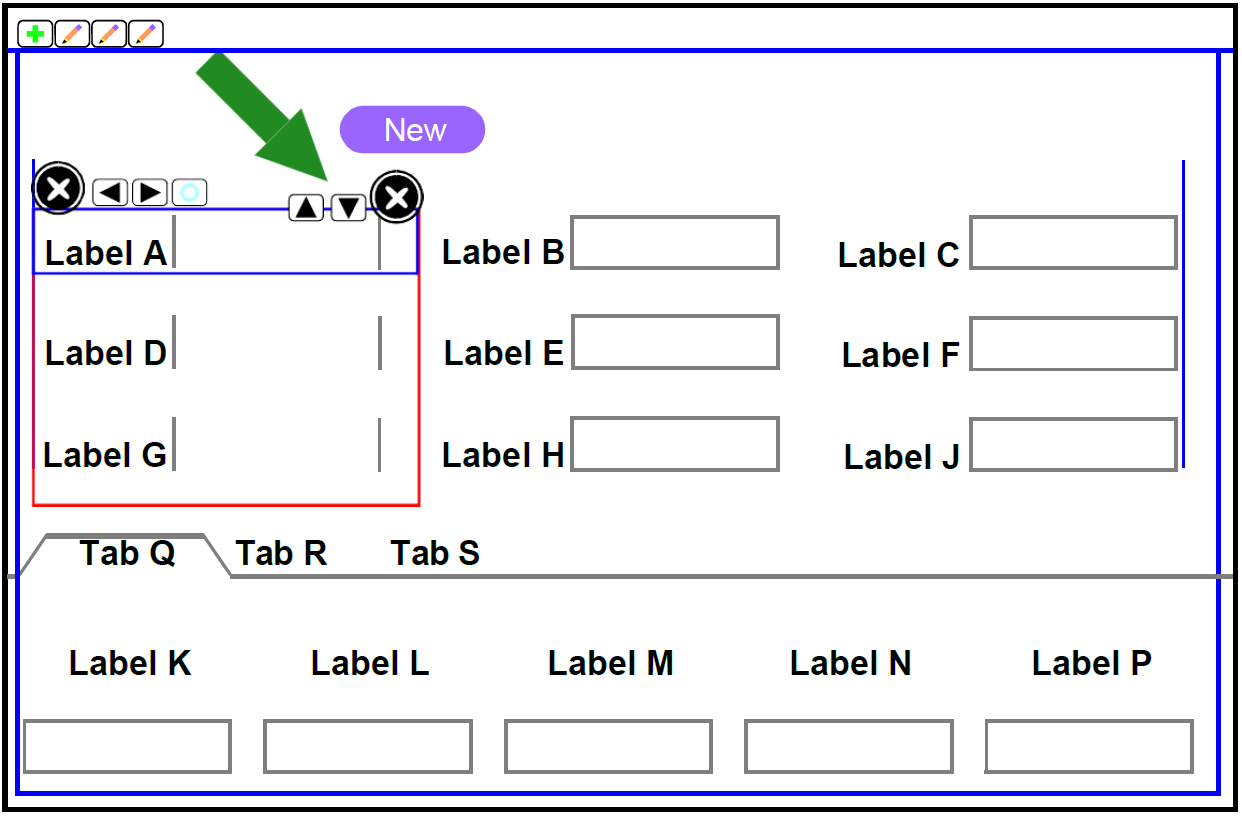
- Do one of the following:
- Click the field up button
 to move the field up.
 - Click the field down button
 to move the field down.
In this example, the field Label A moves down.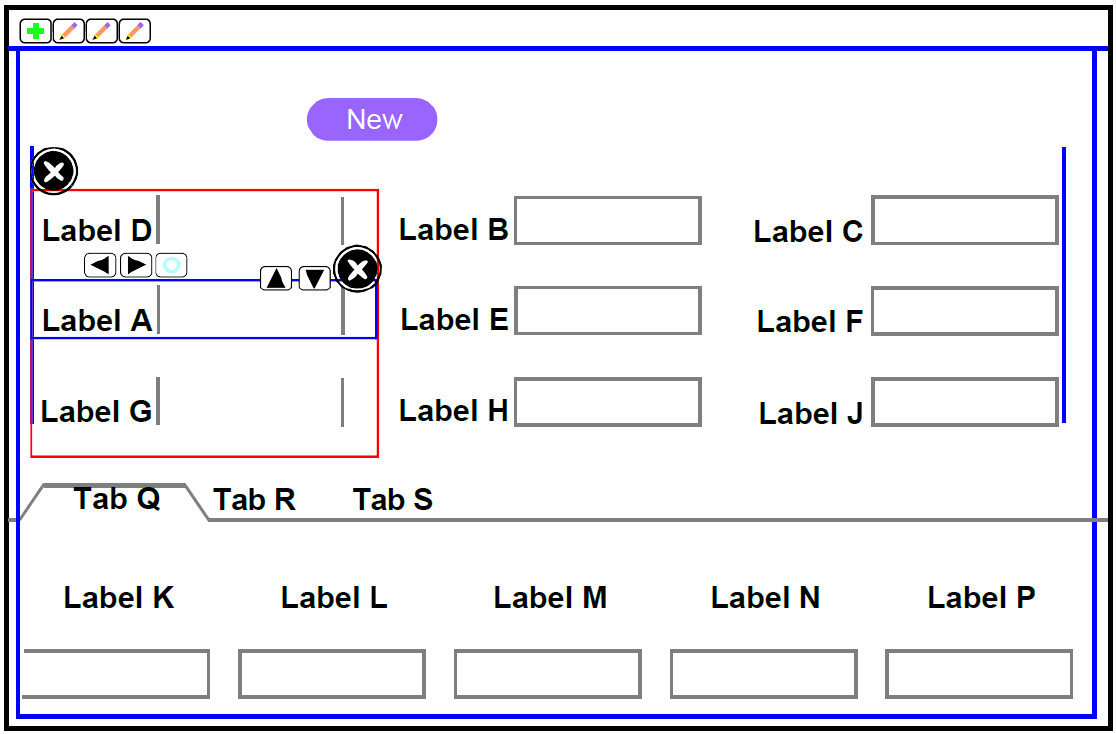
- Click the field up button
- Do one of the following:
- Click the column left button
to move the column left.
- Click the column right button
to move the column right.
- Click the column left button
- When you are done linking, click OK.
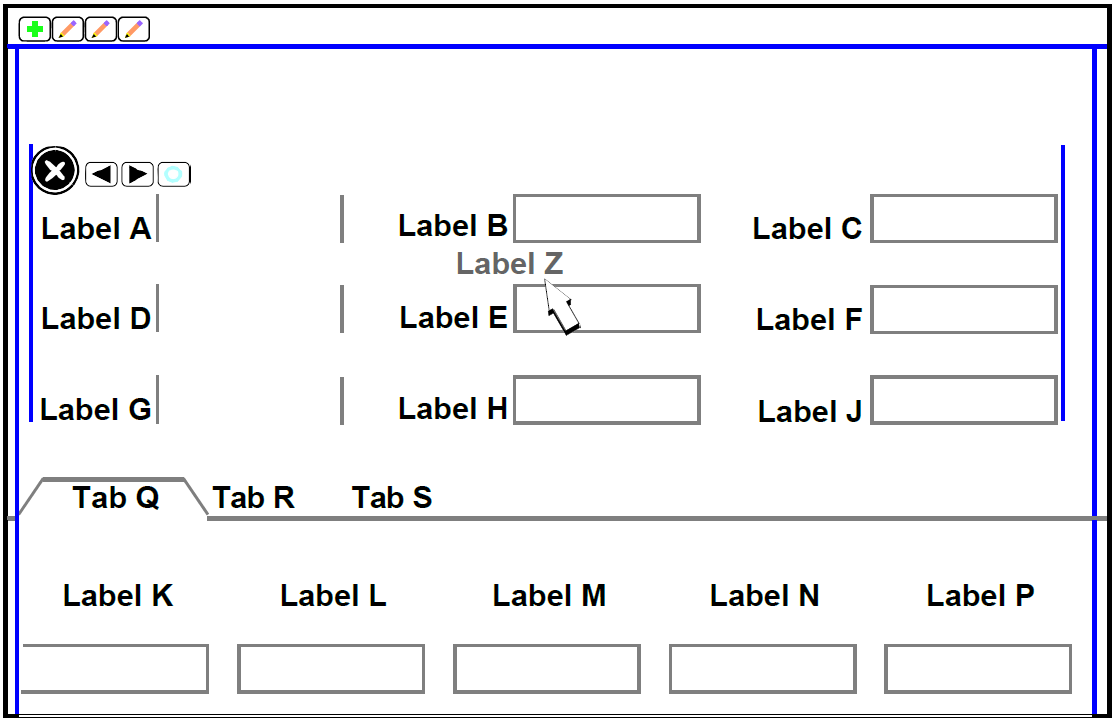
Move a field to another column
- Click the field you want to move. Framesand tool buttons appear.
In this example, the Label A field is selected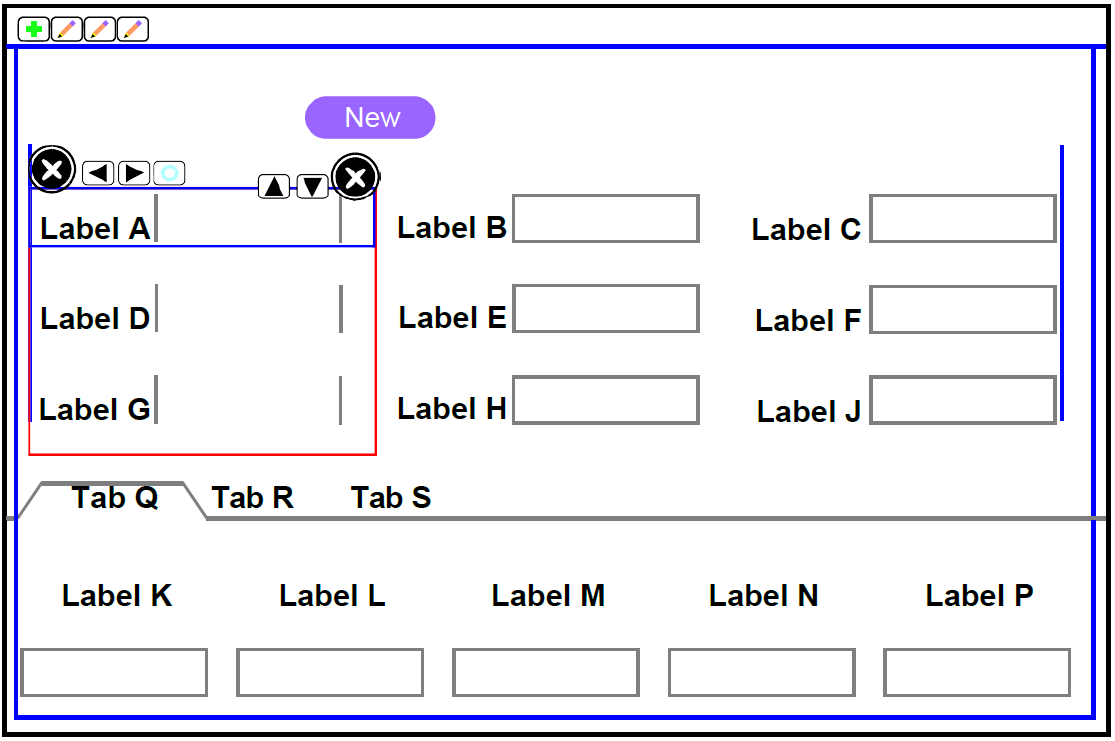
- Click and hold the field you want to move and drag it to where you want
it to appear.
In this example, the field label appears grey where you plan to drop the field, between fields Label B and Label H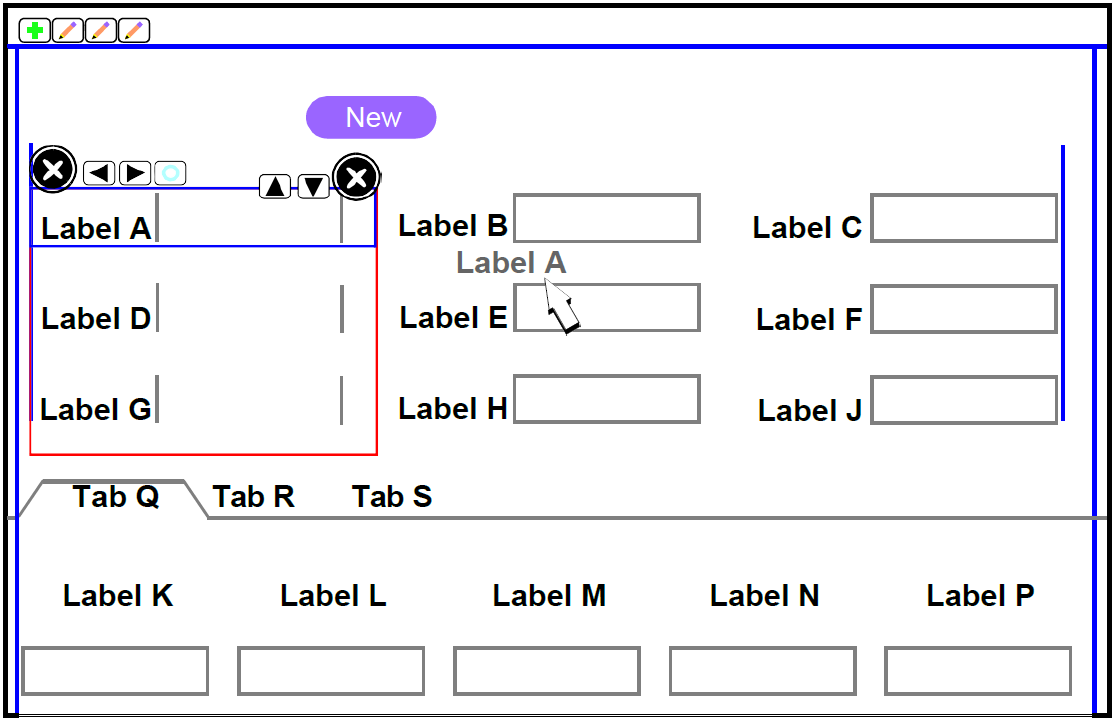
- Release the mouse button. The field relocates to its new location
Move a button
- Click the button you want to move. Frames and tool buttons appear. In
this example, the Delete button is selected.
In this example, the Label A field is selected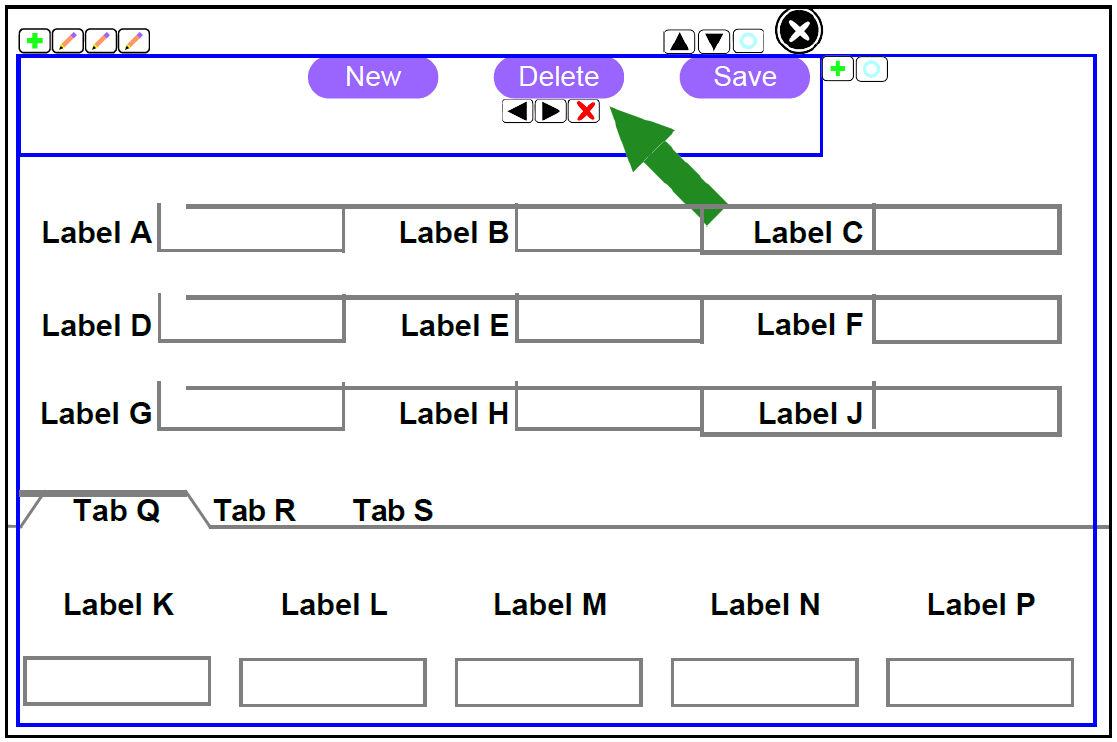
- Click the arrow for the button you want to move.
In this example, the Delete button is moved to the right.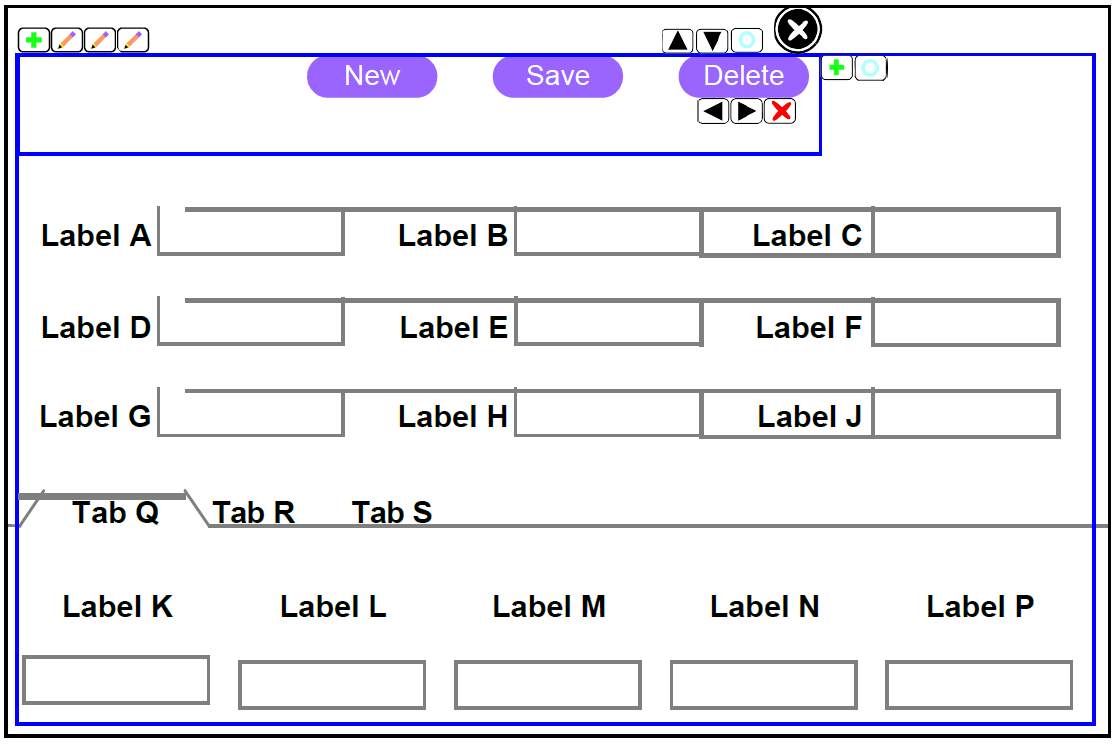
- Release the mouse button. The field relocates to its new location
Add Screen Elements
Add custom metadata to a user-defined field
Usually you use the provided user‐defined fields for your own purposes. This procedure also applies to columns on custom tables. As you update custom metadata for your own purposes, refer often to the FSM Metadata screen.
- Access the Custom Metadata screen.
- Perform a search for your primary table. If no custom metadata appears,
do the following:
- Click the link to create a new record.
- In the Table field, enter the appropriate table name. For example, the primary table for fields you add to the header, or a child table name for fields you add to a listview.
- For each column (field) to which you want to apply custom metadata, do
the following:
- Verify the Column Def tab is selected.
- In the Columns area, click New.
- In the Column Name field, enter the name of the column (field).
- If you want a default value to appear in the field when a new record is created, in the Default Value field, enter that value.
- If you want to require an entry into the field, select the Is Required option.
- If you want the field to always be read only (cannot be entered or changed by the user) on every screen, select the Is Read Only option.
- If you want to assign a different field label or description for
this field, enter the appropriate message IDs
in the Description Message ID and Label
Message ID fields.
For more information about creating custom messages, see “Messages” in the IFS Field Service Maintenance Reference Guide.
Add a lookup, or validation, to a user-defined field
- In the Columns area, select the column to which you want to add a lookup.
- In the Lookups area, click New.
- In the Sequence field, enter a sequence number.
- In the Lookup Tab Name field, enter the name of the table that contains the data you want to look up.
- In the Lookup Col Name field, enter the name of the column that contains the data you want to look up.
- If you want to validate entered data with another table or tables, do
the following:
- In the Validate Col Name field, enter the column on the table that you want to validate.
- If you want only certain values to be validated, in the In the
Validate Constant field, enter the valid
value.
Multiple lines can be entered to validate multiple columns at once or to validate with a code table.
Add user-defined fields to the screen
- In the toolbar, click Add Screen Fields
 .This
button appears grey until you hover over it. The Add Screen Fields
window appears.
.This
button appears grey until you hover over it. The Add Screen Fields
window appears. - On the unlabeled list, select the table whose fields you want to add to the screen. Only tables appear for which you have defined relationships.
- Select a field you want to add to the screen. Drag it from the Add
Screen Fields window to the appropriate location on the screen. You can
add fields to the search pane, results pane, workspace header, or one of
the tabs.
In this example, the field label appears grey where you plan to drop the field, between fields Label B and Label H. - Release the mouse button. The field relocates to its new location.
- Click Save .
 .
.
Add an expander to a listview
- Click a field in the listview you want to add the expander to. Frames
and tool buttons appear.
In this example, the Label M field is selected. - Click Add Listview Expander

Add buttons to a screen
- Click any button to select the button frame.
- Click Add New Button
- On the menu that appears, select the type of button to add. The new button appears to the right of existing buttons.
- In the properties pane, enter the appropriate values for label or label message ID.
- If you added a blank button, right‐click the button, select Assign Button as, and then select the appropriate value.
- To move the button, click the appropriate arrows.
Create a Screen
Create a table alias
If you want to reference the primary table on the header and on one or more tabs, do the following.
- Access the Custom Metadata screen of Studio.
- Click New.
- In the Table Name field, enter the name of your table alias.
- In the Alias of Table Name field, enter the name of the table you are aliasing.
- Fill the rest of the fields in the header as appropriate.
- Click Save.
Create a table alias
- Access the User Interface screen of Studio.
- In the toolbar, click Add Screen
 .This
button appears grey until you hover over it..
.This
button appears grey until you hover over it.. - On the Create New Screen window, do the following:
- On the Choose Primary Table list, select the primary table for your screen.
- On the Choose Screen Pattern list, select the screen pattern for your screen.
- In the Choose Screen Name field, enter the name of your screen. This name is used to identify your screen within Studio. It is not used as the screen title nor menu item.
- Click Next
 .
.
- On the toolbar, click Save . Your
screen is saved.
- On the Screen Explorer, click the purple multi‐mode button until Custom Screen List appears and select the screen you just saved.
Create child table relationships and a new tab
If you want to add a tab and reference an existing table, skip to step 8. You enter new information on the plus line.
- Click Edit Child Relations
 . This
button appears grey until you hover over it.
. This
button appears grey until you hover over it. - In the Relation Defs area, do the following for each relationship:
- On the Parent Table list, select the parent of the relationship.
- On the Related Table list, select the child of the relationship.
- If you want to link another child to the table specified in the Related Table field, on the Linked Table list, select the “grandchild” of the relationship.
- In the Relation Maps area, do the following for each relationship:
- Select a relationship in the Relation Defs area.
- For the table defaulted in the Primary Table field, on the Primary Column list, select the column you want to use to link the tables.
- For the table defaulted in the Related Table field, on the Related Column list, select the column you want to use to link the tables.
- If you want to constrain the relationship, in the Relation Constraints
area, do the following:
- Select a relationship in the Relation Defs area.
- Select a relationship map in the Relation Maps area.
- In the Related Field Name field, enter the column you want to constrain.
- On the Operator list, select the appropriate operator.
- In the Value field, enter the constraint value.
- If you want a child table sorted by a value other than key values, do
the following:
- Select a relationship in the Relation Defs area.
- Select a relationship map in the Relation Maps area.
- In the Order Bys area, on the Order By list, select whether you want to sort ascending or descending.
- In the Name field, enter the full name in table. Column format.
- In the search pane, select the appropriate number of columns. We recommend you select one column.
- In the workspace header, select the appropriate number of columns. For up to ten fields, we recommend two columns; for more than ten fields, we recommend three columns.
- In the tab area, do one of the following:
- If you want to add a list of child table records organized in columns, click Listview.
- If you want to add more fields from the primary table, click Item Panel.
- If you want to add sub‐tabs, click TabControl.
Add a screen to a menu
- Access the Menu Definitions screen of Studio.
- Do one of the following:
- Search for an override for the menu you want to add the screen to.
- Click New to create a new menu override and, in the Menu ID field, enter the name of the menu you want to add the screen to.
- In the header, enter any overrides you want to apply to the menu as a whole.
- On the Menu Functions Def tab, click New.
- On the Function ID list, select the function ID that corresponds to your new screen.
- In the Sequence field, enter the sequence in which you want the screen to appear on the menu. If you specify the same sequence as another menu item, they appear alphabetically.
- Do one of the following:
- In the Label Message ID field, enter the message ID for the screen label.
- In the Label field, enter the screen label.
- Do one of the following:
- In the Description Message ID field, enter the message ID for the screen description.
- In the Description field, enter the screen description.
- If you want your screen disabled by default and only enabled by role, select Disabled.
Link Events to Client Scripts
Link to screen events
- In the toolbar, click View Screen Events. The screen events window appears. This window is separated into types of events that can be linked.
- For the type of event you want to add, select the Event Name and Client Script ID values you want to associate with each other.
- Click Add.
- When you are done linking, click OK.
Link to other events
- Select the item to which you want to link events and scripts:
- Listview
- Field
- Button
- Right‐click the item and select Custom Code.
- On the Event list, select the event you want to link.
- On the Client Script ID list, select the script you want to link.
- Click Add.
- When you are done linking, click OK.